Studio 5000 Source Protection
23rd March, 2024.
In this post, we will see the concept of source protection in Studio 5000 software.
Every industrial automation software provides a feature to protect it’s program from unwanted access. This helps as no one can then access, view or edit the program without proper credentials. One of the most famous brands in industrial automation is Rockwell Automation. The PLC software used widely is Studio 5000. This software too has provisions for protecting the program by locking it with passwords. In their language, it is called source protection. In this post, we will see the concept of source protection in Studio 5000.
What is source protection in Studio 5000?
Source means a code. So, source protection term is used in Studio 5000 to show that the code can be protected. Once applied, the code cannot be viewed or edited. For this, there are two methods - source key and license source. In this post, we will only focus on the source key. Suppose you have 10 sections and 20 add-on instructions in your program. Here, you have the option to individually protect each section and make your choice, whether to keep it locked or unlocked. When a section is locked, the user cannot edit, print, view, export, and search / replace tags. As search is also locked, when you find the tags in the whole project, the search window will not give any information on these tags.
Now, a source key is a text file where a password is written. The text file follows the IEC-61131 naming convention and includes letters, numbers and underline characters. It must begin with a letter or underline character. The maximum length allowed is 40 characters. The source key is saved as .dat format. You can open this file using notepad and edit it accordingly for your appropriate password.
How do I add source protection to RSLogix 5000?
Let us take a blank new project for this study. Refer the following steps for more information.
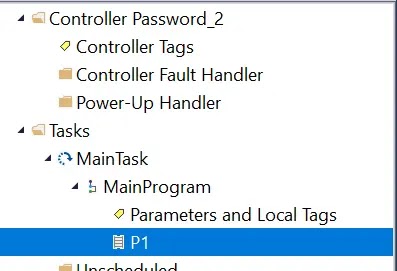
Add a new section and name it as P1. As of now, we will not do any coding. We will solely focus on how to lock and unlock a section. Then, you have to go to the following options - tools - security - configure source protection. Refer to the below image for understanding.
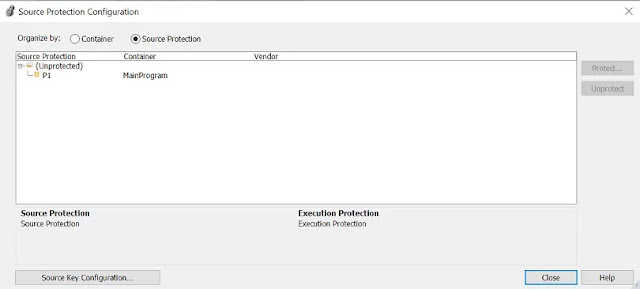
The following window will open. Here, the three main options to look are - source key configuration, protect and unprotect. Source key configuration allows the user to choose, edit or delete the source file (.dat file) which is the main element and controls all the locking and unlocking process. The protect option will lock the section chosen and the unprotect option will unlock the section chosen.
Click source key configuration. You will be asked three options - specify, view and clear. Specify will allow you to choose the file for protection. Choose the .dat file you have created. If you have not done so, then you will be asked automatically to create one. For that, after you click specify, you will be asked to choose a location. Choose a path for creating or choose the path which has the file already. In our case, we will create a new one. Just choose the location and when asked to create a new file, click yes. The .dat file will be created in that location. Now, without closing any window, just open the file parallely using a notepad and enter your password and save it.
Now, in the original popup which is open (specify one), click close. The source key has now been assigned in your program. This means that this password will now be used to lock or unlock a section.
Now, in the above earlier image, click the section you want to protect. Then, click protect. The following below window will open. Here, you have to first choose the source key, then select the source key you have configured and click ok. Before clicking ok, you can verify whether you have chosen the right path or not by seeing the source key provider shown below. It shows the correct file path of the source key. Once confirmed, that section is now protected.
Now, remove the source file from your current location and move it to some other safe position of your choice. This step is the main one as without it, the section will not go protected. After this, when you see your program, you will see the grey color highlighted before the P1 section as shown below. Now, you cannot open this section.
To again unlock this section, go to source protection configuration and assign the source file again, either the new path that you shifted or again copying back into the original path defined earlier. Click the section and press unprotect. The section will open and you can now see and edit that part.
I have covered a general theory related to Studio 5000 source protection used in industries. I have also not attempted to cover all the methods, as it can vary from systems to systems. Once you are familiar with this engineering, you can easily tackle all types of problems in it.
Thank you for reading the post. I hope you liked it and will find a new way in this type of technology.


Comments
Post a Comment
If you have any queries, please let me know